December 10, 2024
Automate frame section creation in SAP2000 using Python and Excel

by Luis Maldonado de la Torre

What if you could automate this process? With the SAP2000 API and Python, you can transform a traditional workflow into an efficient and seamless one. It is straightforward to generate and define load patterns, combinations, and mass sources through code. Additionally, automation stands out in tasks such as assigning restraints to nodes, generating elements like beams, columns, and slabs, and distributing uniform or point loads.
In this blog, we'll explore how to use Python to create frame sections for SAP2000 automatically by reading section properties from an Excel file.
By the end, you will have an automated workflow that reduces manual effort and enhances your productivity.
Getting Started
Using the SAP2000 API, we connect to an active instance of the program and define material properties, cross-sectional geometries, and reinforcement details for frames. We'll start with some simple examples of creating individual beam and column sections, and later show how to automate the entire process using data from Excel.
1. Import Necessary Libraries
To begin, we need to import the required libraries: comtypes to connect with SAP2000 and pandas to read Excel data:
1from comtypes.client import GetActiveObject
2import pandas as pd
2. Connect to SAP2000
Ensure that SAP2000 is open, then connect to the active instance using the following code:
1try:
2SapModel = GetActiveObject("CSI.SAP2000.API.SapObject").SapModel
3print("Successfully connected to SAP2000.")
4except Exception as e:
5print("Failed to connect to SAP2000. Ensure the program is open.")
6print(f"Error details: {e}")
3. Create Materials
In this section, we will first learn how to use the SAP2000 API functions to define materials step by step.
Once we understand the process, we will move on to a more efficient approach by reading data from an Excel file. This allows us to create multiple materials automatically.
Reinforcement Steel
We must indicate the units with which we will work, using the following code we will define the work units of Kg, m and C, which have the number 8 as a label:
1kgf_m_C = 8
2SapModel.SetPresentUnits(kgf_m_C)
Next, we create the material properties this involves setting material type, modulus of elasticity, Poisson's ratio, thermal coefficient, and strength properties for the reinforcement steel grade 60 with a yield strength of 4200 kg/cm² and a modulus of elasticity of 2.0E10 kg/cm².
1material_id = 6  # Rebar
2
3SapModel.PropMaterial.SetMaterial(
4    'fy=4200',  # Material name
5    material_id  # Material Type ID
6)
7
8SapModel.PropMaterial.SetMPIsotropic(
9    'fy=4200',
10    2.0E10,       # Modulus of elasticity
11    0.2,          # Poisson's ratio
12    9.90E-06      # Thermal coefficient
13)
14
15SapModel.PropMaterial.SetWeightAndMass(
16    'fy=4200',
17    1,            # 1: Weight, 2: Mass per unit volume
18    7850          # Value
19)
20
21SapModel.PropMaterial.SetORebar(
22    'fy=4200',
23    42000000,     # Yield strength
24    63000000,     # Tensile strength
25    46000000,     # Expected Yield strength
26    69000000,     # Expected Tensile strength
27    2,            # Stress-strain curve type
28    2,            # Stress-strain curve type - Hysteretic
29    0.02,         # Strain at Hardening
30    0.1,          # Strain Ultimate
31    False         # True: Uses Caltrans controlling strain values
32)
Read Excel File "SectionData.xlsx"
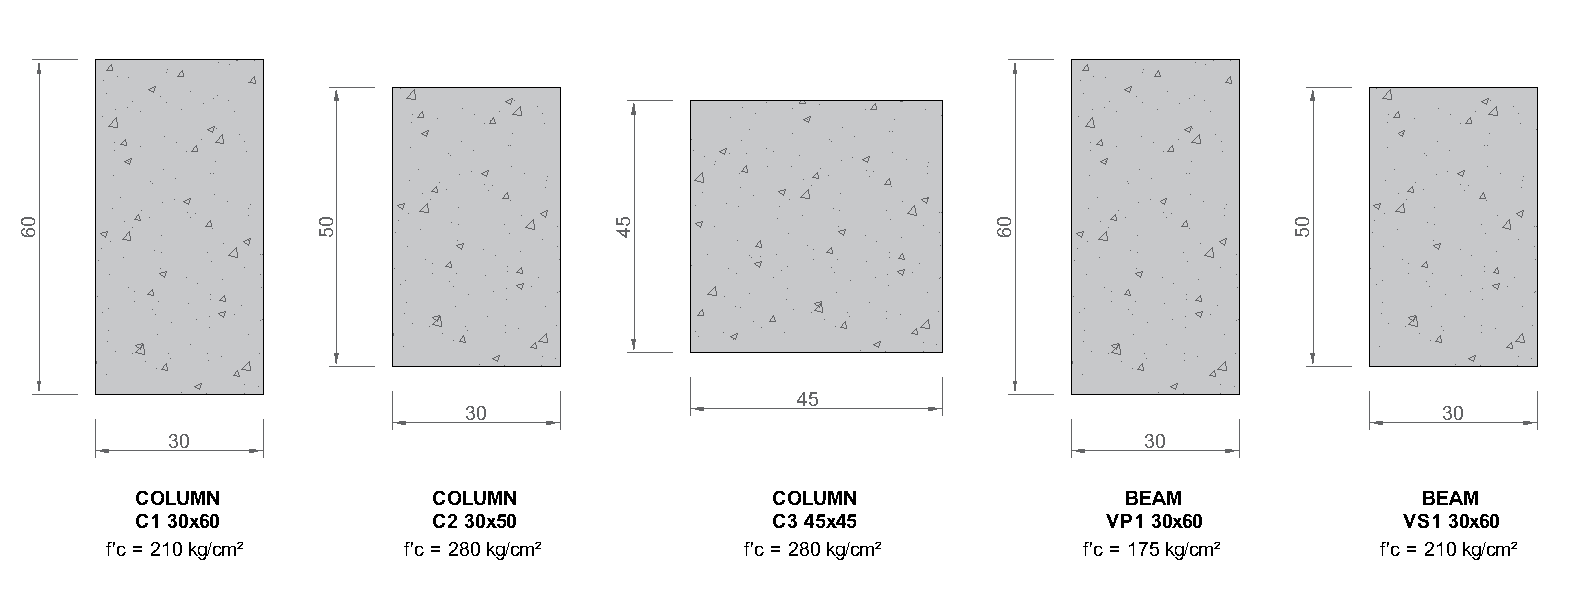
We then read section properties from an Excel file that contains all necessary details about the materials, dimensions, and types of frames (beams or columns):
1df = pd.read_excel("SectionData.xlsx")
If you would like to use the same Excel sheet as is used in this blog, feel free to download it here.
It is important to know the units of the data that Excel contains.
The column ID is the element label, b and h are the base and height in centimeters, respectively, and fc is the concrete compressive strength in kg/cm²:
| Type | ID | b | h | fc |
|---|---|---|---|---|
| COL | C1 | 30 | 60 | 210 |
| COL | C2 | 30 | 50 | 280 |
| COL | C3 | 30 | 60 | 175 |
| BEAM | VP1 | 30 | 60 | 210 |
| BEAM | VS1 | 30 | 50 | 280 |
| BEAM | VB1 | 30 | 60 | 210 |
Create Concrete Material from Excel Data
After reading the Excel file, we will identify the unique compressive strength (f'c) values that will be assigned to the frame element sections. Then, we will create a dictionary with the names that each material will have.
1fc = df["fc"].unique()
2name_material = {fc_i: f'fc={fc_i}' for fc_i in fc}
Next, we will start creating the concrete materials, assigning their properties, such as modulus of elasticity and strength, according to specific f'c values.
1for fc_i in fc:
2    material_id = 2  # Concrete
3    material = name_material.get(fc_i)
4    SapModel.PropMaterial.SetMaterial(material, material_id)
5    E = 15100 * (fc_i ** 0.5) * 10000  # (kgf/m²)
6    SapModel.PropMaterial.SetMPIsotropic(material, E, 0.25, 9.90E-06)
7    SapModel.PropMaterial.SetWeightAndMass(material, 1, 2400)
8    SapModel.PropMaterial.SetOConcrete(material, 2800000, False, 0, 1, 2, 0.0022, 0.0052)
4. Creating Beam and Column Sections
Before we move on to automation, let's look at some examples of how to create sections. We'll do an example of a beam and a column to demonstrate the basic workflow.
Example:
We define a beam section (BEAM_1) with the dimensions 0.6 m depth and 0.3 m width and a column section (COLUMN_1) with dimensions 0.45 m by 0.45 m, using the SetRectangle method.
Let's not forget that we have defined our work unit in meters and it is important to note that the material fc=280 must exist.
1# Define rectangular section properties for a beam
2SapModel.PropFrame.SetRectangle('BEAM_1',    # Section name
3                                'fc=280',    # Existing material name
4                                0.6,         # Depth
5                                0.3)         # Width
6# Define rectangular section properties for a column
7SapModel.PropFrame.SetRectangle('COLUMN_1', 'fc=280', 0.25, 0.50)
8
Creating a Beam Section
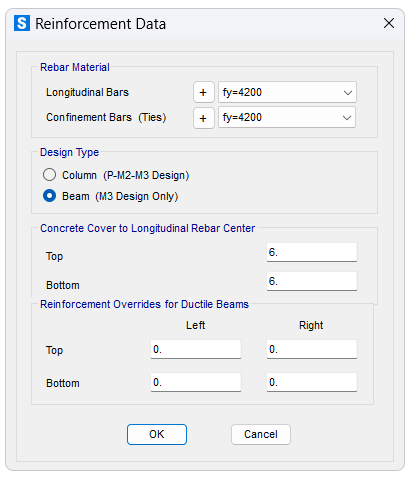
SetRebarBeam adds longitudinal and transverse reinforcement.
1# Define rebar properties for the beam
2SapModel.PropFrame.SetRebarBeam('BEAM_1',
3  # Section name
4                                'fy=4200',   # Longitudinal rebar material
5
6                                'fy=4200',   # Transverse rebar material
7
8                                0.06,        # Top cover
9
10                                0.06,        # Bottom cover
11
12                                0,              # Top left area
13
14                                0,              # Top right area
15
16                                0 ,             # Bottom left area
17
18                                0)              # Bottom right area
19
Creating a Column Section
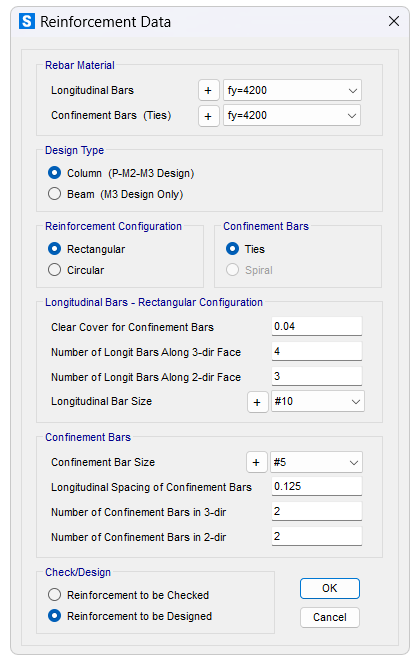
Here, we also specify the rebar arrangement using SetRebarColumn, including longitudinal and Confinement reinforcement properties.
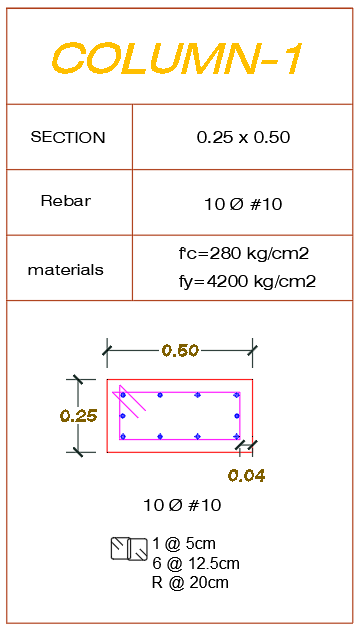
For this, we will work with the data provided in the plan. The column section will measure 0.25m x 0.50m, with 10 longitudinal reinforcement bars of #10 diameter. The concrete's compressive strength will be 280 kg/cm², and the reinforcement steel's yield strength will be 4200 kg/cm². The bars and stirrups will be distributed as indicated in the plan.
1# Define rebar properties for the column
2SapModel.PropFrame.SetRebarColumn('COLUMN_1',  # Section name
3
4                                  'fy=4200',   # Longitudinal rebar material
5
6                                  'fy=4200',   # Transverse rebar material
7
8                                  1,           # Rectangular pattern
9
10                                  1,           # Confinement type (ties)
11
12                                  0.04,    # Cover
13
14                                  0,           # Applies only to circular columns
15
16                                  4,           # Number of bars along local axis 3
17
18                                  3,           # Number of bars along local axis 2
19
20                                  '#10',       # Longitudinal bar size
21
22                                  '#5',        # Confinement bar size
23
24                                  0.125,       # Tie spacing (m)
25
26                                  2,           # Number of ties along axis 2
27
28                                  2,           # Number of ties along axis 3
29
30                                  True)       # To be designed
31
Automate Section Creation for Beams and Columns Using Excel Data
First we must change our work units, because the Excel sheet contains information in units of kg and cm
1kg_cm_C = 14
2SapModel.SetPresentUnits(kg_cm_C)
Finally, we automate the process for creating beam and column sections using the data from the Excel file. The script iterates through each row of the DataFrame and creates the appropriate section in SAP2000:
1for _, row in df.iterrows():
2    material = name_material.get(row["fc"])
3    name_section = f'{row["ID"]}-{row["b"]}x{row["h"]}'
4    SapModel.PropFrame.SetRectangle(name_section, material, row["h"], row["b"])
5    if row["Type"] == "COL":
6        SapModel.PropFrame.SetRebarColumn(name_section, 'fy=4200', 'fy=4200', 1, 1, 4, 0, 4, 5, "#5", "#3", 12.5, 4, 2, True)
7    elif row["Type"] == "BEAM":
8        SapModel.PropFrame.SetRebarBeam(name_section, 'fy=4200', 'fy=4200', 6, 6, 0, 0, 0, 0)
9    print(f'{name_section} {material} has been created')
5. Final Code
For your convenience, the complete code can be found here:
1from comtypes.client import GetActiveObject
2import pandas as pd
3
4try:
5    SapModel = GetActiveObject("CSI.SAP2000.API.SapObject").SapModel
6    print("Successfully connected to SAP2000.")
7except Exception as e:
8    print("Failed to connect to SAP2000. Ensure the program is open.")
9    print(f"Error details: {e}")
10
11# Set units to kgf, m, C
12kgf_m_C = 8
13SapModel.SetPresentUnits(kgf_m_C)
14
15# Set material properties for reinforcement steel
16material_id = 6  # Rebar
17SapModel.PropMaterial.SetMaterial('fy=4200', material_id)
18SapModel.PropMaterial.SetMPIsotropic('fy=4200', 2.0E10, 0.2, 9.90E-06)
19SapModel.PropMaterial.SetWeightAndMass('fy=4200', 1, 7850)
20SapModel.PropMaterial.SetORebar('fy=4200', 42000000, 63000000, 46000000, 69000000, 2, 2, 0.02, 0.1, False)
21
22# Read data from Excel
23df = pd.read_excel("SectionData.xlsx")
24
25# Create concrete materials from Excel data
26fc = df["fc"].unique()
27name_material = {fc_i: f'fc={fc_i}' for fc_i in fc}
28for fc_i in fc:
29    material_id = 2  # Concrete
30    material = name_material.get(fc_i)
31    SapModel.PropMaterial.SetMaterial(material, material_id)
32    E = 15100 * (fc_i ** 0.5) * 10000  # (kgf/m²)
33    SapModel.PropMaterial.SetMPIsotropic(material, E, 0.25, 9.90E-06)
34    SapModel.PropMaterial.SetWeightAndMass(material, 1, 2400)
35    SapModel.PropMaterial.SetOConcrete(material, 2800000, False, 0, 1, 2, 0.0022, 0.0052)
36
37# Change units to kg, cm, C
38kg_cm_C = 14
39SapModel.SetPresentUnits(kg_cm_C)
40
41# Create sections from Excel data
42for _, row in df.iterrows():
43    material = name_material.get(row["fc"])
44    name_section = f'{row["ID"]}-{row["b"]}x{row["h"]}'
45    SapModel.PropFrame.SetRectangle(name_section, material, row["h"], row["b"])
46    if row["Type"] == "COL":
47        SapModel.PropFrame.SetRebarColumn(name_section, 'fy=4200', 'fy=4200', 1, 1, 4, 0, 4, 5, "#5", "#3", 12.5, 4, 2, True)
48    elif row["Type"] == "BEAM":
49        SapModel.PropFrame.SetRebarBeam(name_section, 'fy=4200', 'fy=4200', 6, 6, 0, 0, 0, 0)
50    print(f'{name_section} {material} has been created')
Each beam and column section is created automatically, saving a significant amount of time compared to manual input.
Conclusion
The SAP2000 API combined with Python opens the door to streamlined, efficient workflows in structural engineering. From defining materials and creating sections to automating repetitive tasks, these tools help reduce errors, improve consistency, and save valuable time when managing complex projects.
But this is just the beginning—Python's versatility allows you to enhance every aspect of your engineering processes. Ready to take your automation skills further? Explore how you can create intuitive and shareable web applications to make your workflows even more powerful. Start automation and unlock the full potential of modern structural engineering today!
