

Download the white paper and get INSPIRED
Learn how collaborative parametric design models allow you to work together for better solutions.
A troubling relationship with 3D models
As a structural engineer, I have always had a challenging relationship with 3D models. I either received overly detailed models that required simplification for analysis or had to start from scratch based on 2D drawings. Either way, setting everything up and continuously modifying and analyzing the design to meet the requirements was time-consuming.
I always wondered if there was a better way. I tried setting up the models parametrically and succeeded to a certain extent. However, as the model became more complex and I started adding operations like extrude, bore, fillet, and pattern to the geometry tree, I could never achieve a truly stable model. Somehow, I would always end up breaking the model after changing some parameters.
As an engineer and a Python enthusiast, I decided to look for a solution that is easy to use and accessible to anyone familiar with the basic concepts of 3D modeling and Python. I wanted to experiment with two approaches: using AI to move from an idea to a first working app faster, and using CAD as code to make the model robust, reusable and truly parametric.
AI for ideation: from engineering concept to geometry logic
Before writing a single line of code, AI can already help you structure your model. Instead of starting from a blank script, you can describe the part you want to create, the main parameters that should control it, and the type of 3D output you need. This is especially useful for turning an engineering idea into a first app structure with inputs, calculations and a 3D model view.
For example, you can use AI agents like VIKTOR’s App Builder to ideate, structure and create engineering apps in minutes with just a prompt. This can help you quickly move from a concept to a working parametric model that you can keep refining with code.

Create an app to interact with a 3D model
However, if you are also like me, you will want to understand what is happening behind the app. AI is a great way to get started, ideate and create a first version quickly, but learning how the geometry is built gives you much more control. That is where CAD as code becomes interesting.
The benefits of CAD as code
If you think about it, all 3D modeling software has some kind of geometry engine under the hood (a CAD kernel), which you can access through the user interface. CAD as code generates 3D models by speaking directly to this CAD kernel using code. This is great because now you can build your 3D models based on logic and engineering principles.
For example, you can define some plate thickness based on a stress formula. Also, because everything is written in code, your models are intrinsically parametric so you can easily modify the model by simply changing a value. On top of that, you get the same benefits of coding in general like version control using Git, quick sharing and re-utilizing of code, and the possibility of using other libraries, like build123d and our preferred choice, CadQuery.
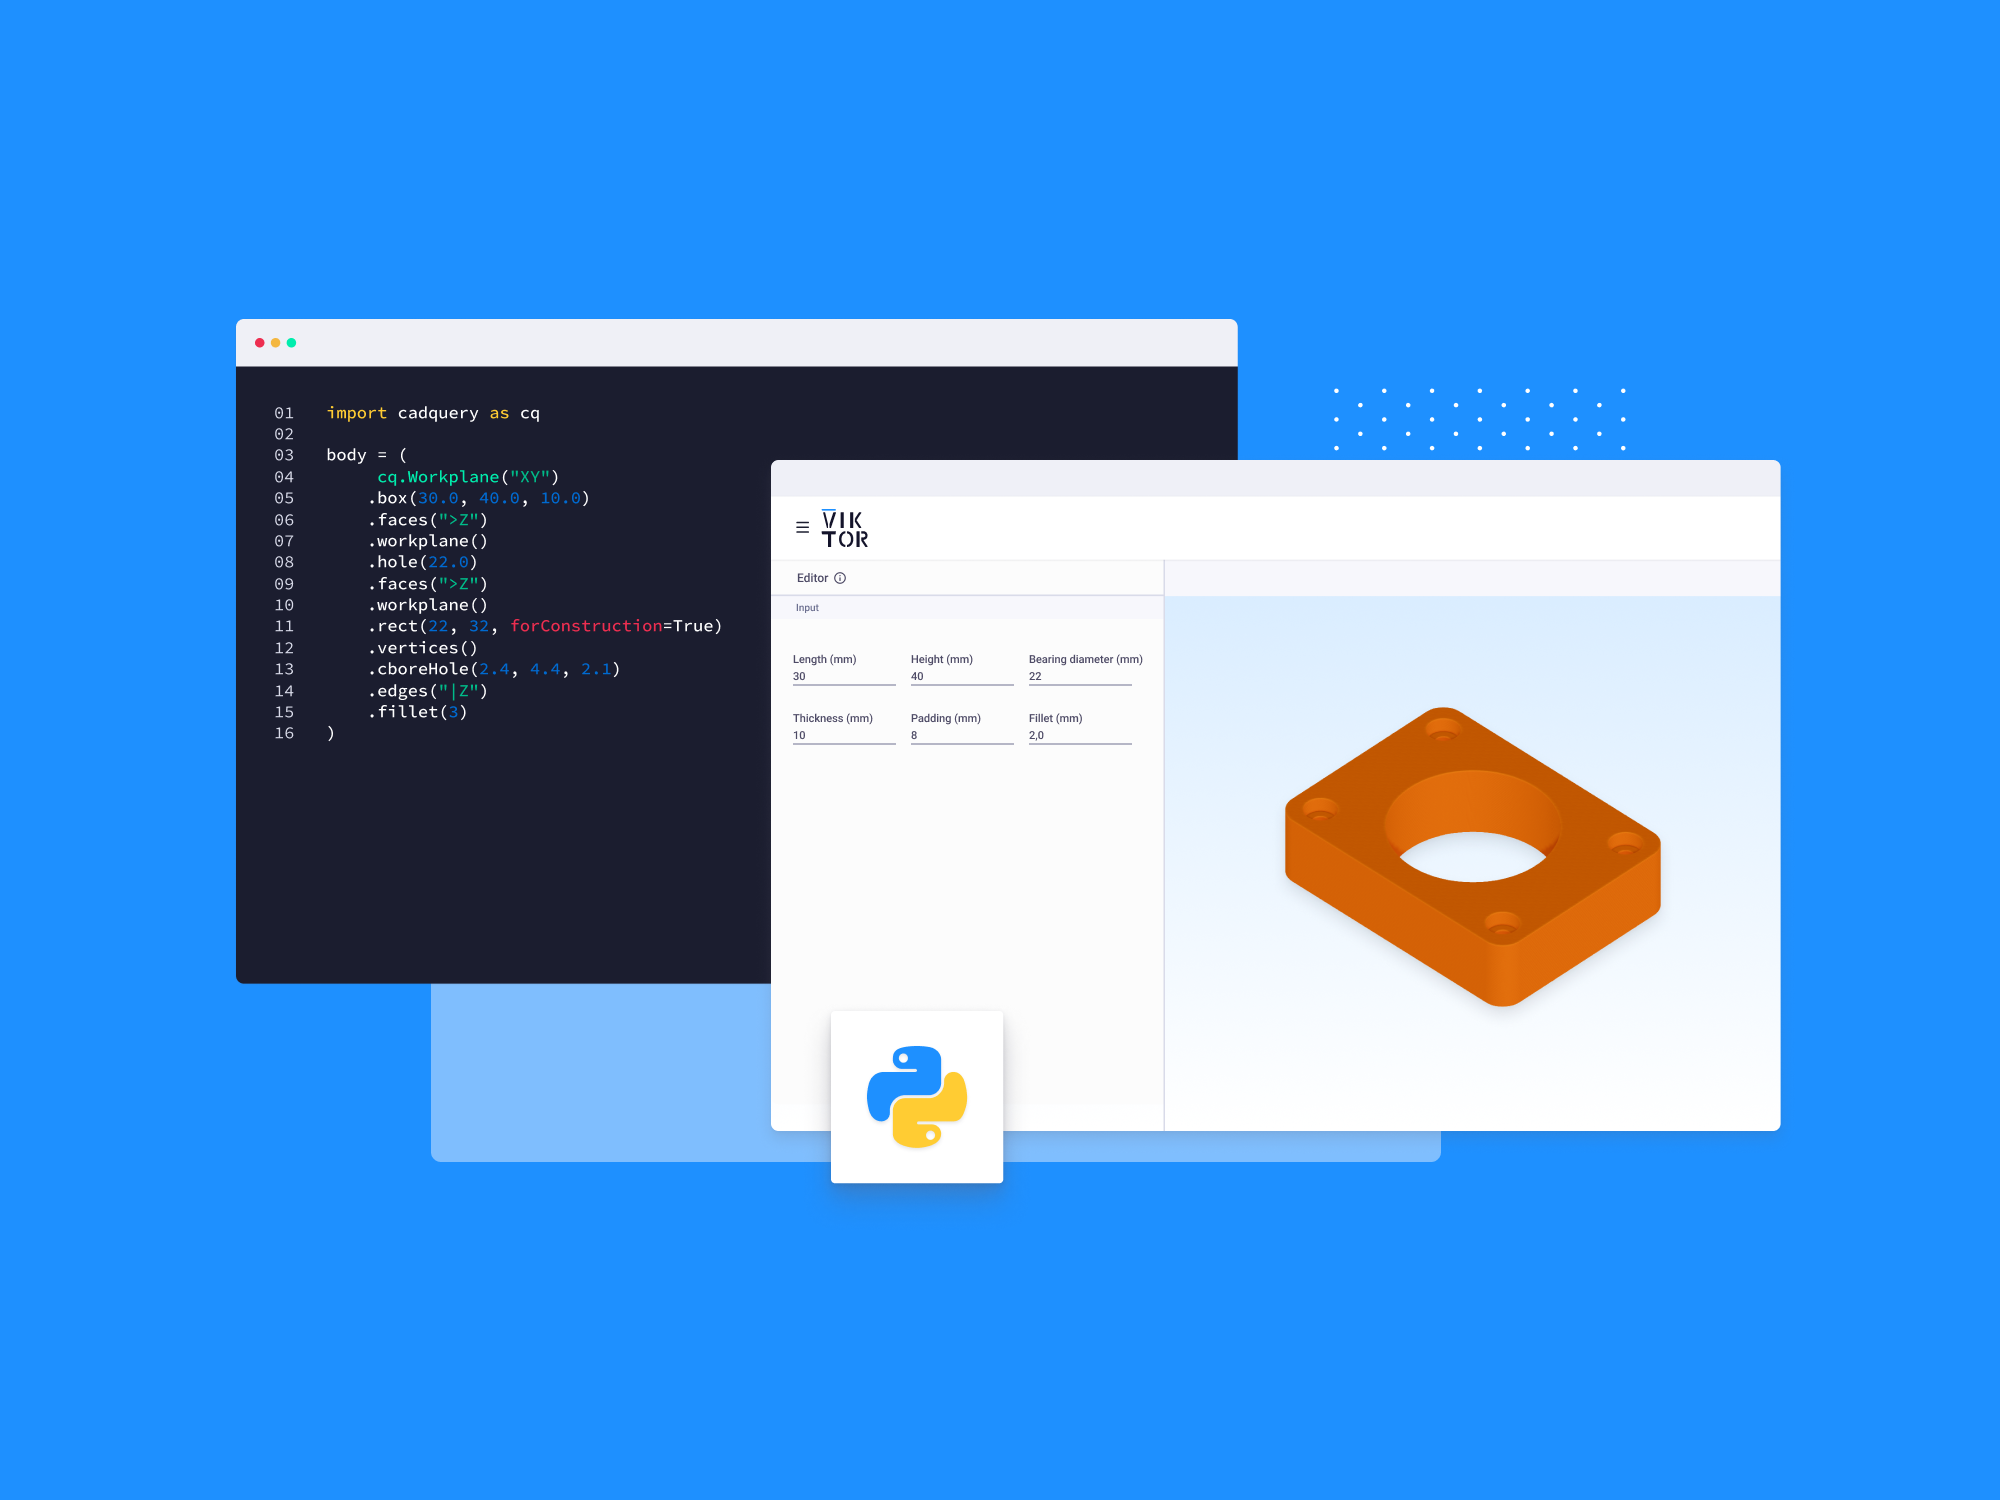
What is CadQuery and how does it work?
CadQuery is an intuitive, easy-to-use Python library for building parametric 3D CAD models. It works similarly to most 3D modeling software: you select a plane, extrude a geometry, create holes, and so on (as explained in the documentation). However, instead of clicking, you achieve this by writing code, as shown in the image below.
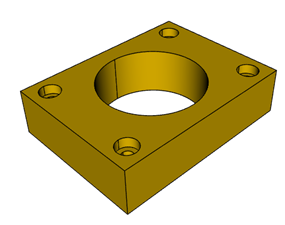
1(length, height, bearing_diam, thickness, padding) = (30.0, 40.0, 22.0, 10.0, 8.0)
2
3result = (
4    cq.Workplane("XY")
5    .box(length, height, thickness)
6    .faces(">Z")
7    .workplane()
8    .hole(bearing_diam)
9    .faces(">Z")
10    .workplane()
11    .rect(length - padding, height - padding, forConstruction=True)
12    .vertices()
13    .cboreHole(2.4, 4.4, 2.1)
14)
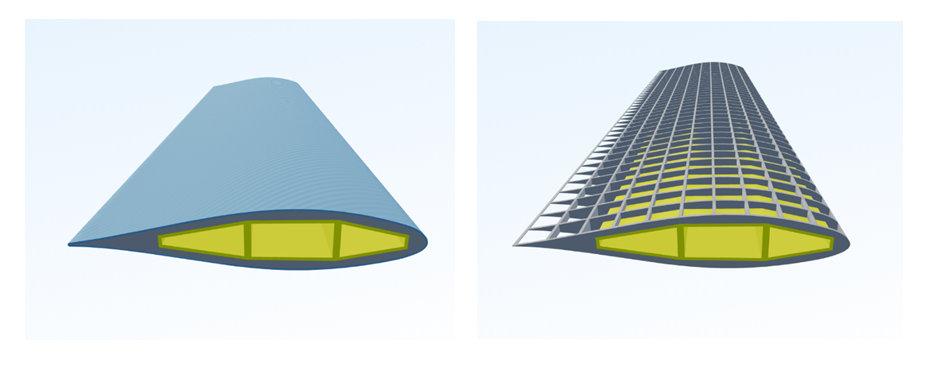
CadQuery is very powerful and has all the basic functionalities of standard 3D modeling. Because it's based on Python, it enables you to do all kinds of calculations and add logic. You can also use other Python libraries, making this incredibly powerful and suitable for automation. For example, this wind structure is made using CadQuery and SplineCloud to define the shape of the airfoil.
Using CadQuery models for FEM, CDF, CAM and BIM
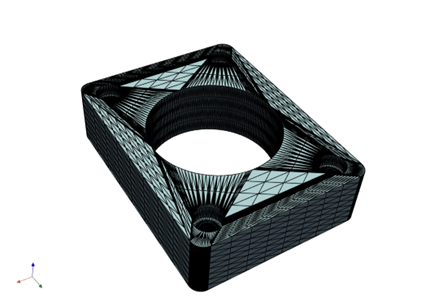
You can export your CadQuery 3D CAD models in multiple formats, such as DXF, STL, glTF and many more. This enables you to import them in different packages so you can do Finite Element Analysis (FEM), Fluid Dynamics (CFD), import them into BIM packages like Revit, or use them for manufacturing with CNC machines or 3D printers. You can also use models you already have and combine them, for example, to create a new assembly.
Of course, you don’t need to import the models manually into your preferred analysis software. If your software has a Python API, you can create the models, send them for analysis, retrieve the results and do the checks you need.
CadQuery is a great library for people who know Python, but what if you want to share your parametric 3D model with people who don’t?
Using VIKTOR, you can make a user-friendly app for your parametric 3D models and all the logic connected with them, and integrate them with 3rd party software for FEM, CFD, BIM and more. This way, anyone can use your logic through a user-friendly interface. This also gives you a lot of control over how the model is designed as, for example, you can define maximum and minimum limits for user input.
Additionally, you protect your code and your intellectual property, as users interact with the application without accessing the underlying code.
To get started making CadQuery is a simple pip install. If you want to start making VIKTOR apps with CadQuery, you only need to add it to your requirements. Converting a CadQuery script into a VIKTOR app might be one of the easiest conversions. Don't have a VIKTOR account yet? Sign up here.
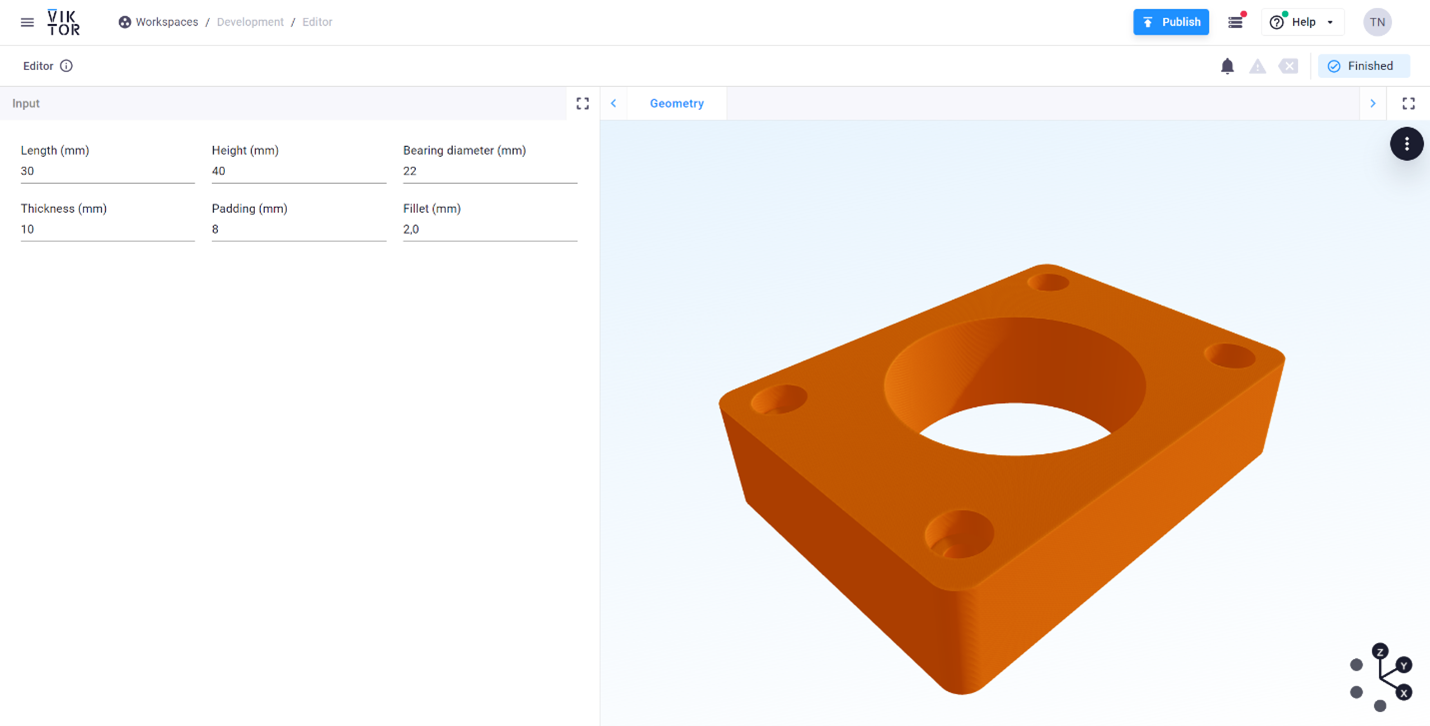
Now, you can start by copying your code into a GeometryView. Here, you add some lines for the export and voila, your design is visible in the app:
1@GeometryView("Geometry", duration_guess=1, x_axis_to_right=True)
2    def get_geometry_view(self, params, **kwargs):
3        """
4        Renders the 3D model. First it (re-)generates the assembly. Then,
5        exports the gltf data to a temporary file, which is passed to
6        GeometryResult and displayed as a GeometryView.
7        """
8        assy = cq.Assembly()
9        body = (
10            cq.Workplane("XY")
11            .box(30.0, 40.0, 10.0)
12            .faces(">Z")
13            .workplane()
14            .hole(22.0)
15            .faces(">Z")
16            .workplane()
17            .rect(40.0 – 8.0, 40.0 – 8.0, forConstruction=True)
18            .vertices()
19            .cboreHole(2.4, 4.4, 2.1)
20            .edges("|Z")
21            .fillet(2.0)
22        )
23
24         assy.add(body, color=cq.Color(1, 0.27, 0.0), name="body")
25        glb = File()  # temporary file to store 3D model as gltf data
26        cq.occ_impl.exporters.assembly.exportGLTF(assy, glb.source, True)
27        return GeometryResult(geometry=glb)
Then we make some NumberFields for our parameters in the parametrization:
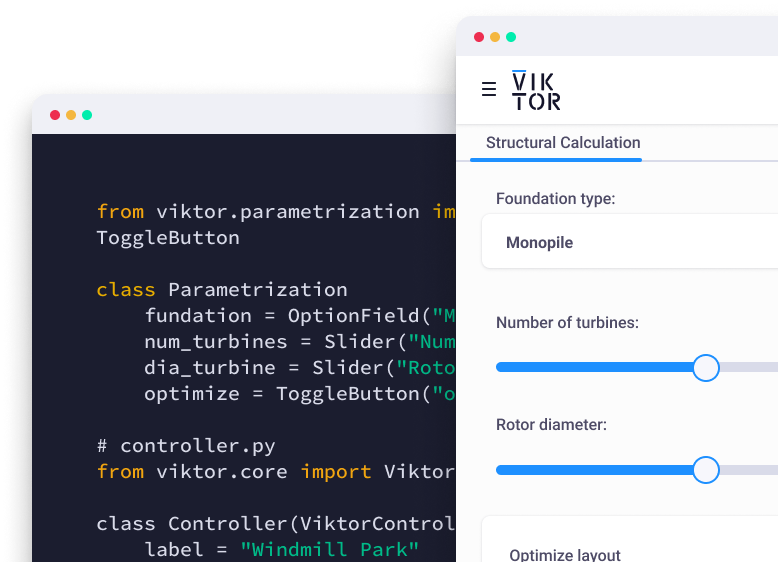
1class Parametrization(ViktorParametrization):
2    length = NumberField("Length", default=30, suffix="mm")
3    height = NumberField("Height", default=40, suffix="mm")
4    bearing_diam = NumberField("Bearing diameter", default=22, suffix="mm")
5    thickness = NumberField("Thickness", default=10, suffix="mm")
6    padding = NumberField("Padding", default=8, suffix="mm")
7    fillet = NumberField("Fillet", default=2, num_decimals=1, step=0.5, suffix="mm")
And finally, we need to connect these parameters to the view. Due to the nature of CadQuery, this conversion can be done in minutes!
1@GeometryView("Geometry", duration_guess=1, x_axis_to_right=True)
2    def get_geometry_view(self, params, **kwargs):
3        """
4        Renders the 3D model. First it (re-)generates the assembly. Then,
5        exports the gltf data to a temporary file, which is passed to
6        GeometryResult and displayed as a GeometryView.
7        """
8        # obtain parametrization fields
9        (length, height, bearing_diam, thickness, padding) = (
10            params.length,
11            params.height,
12            params.bearing_diam,
13            params.thickness,
14            params.padding,
15        )
16
17         assy = cq.Assembly()
18
19         body = (
20            cq.Workplane("XY")
21            .box(length, height, thickness)
22            .faces(">Z")
23            .workplane()
24            .hole(bearing_diam)
25            .faces(">Z")
26            .workplane()
27            .rect(length - padding, height - padding, forConstruction=True)
28            .vertices()
29            .cboreHole(2.4, 4.4, 2.1)
30            .edges("|Z")
31            .fillet(params.fillet)
32        )
33
34        assy.add(body, color=cq.Color(1, 0.27, 0.0), name="body")
35        glb = File()  # temporary file to store 3D model as gltf data
36        cq.occ_impl.exporters.assembly.exportGLTF(assy, glb.source, True)
37        return GeometryResult(geometry=glb)
If you look at the result in your environment, you will see that you have an app that looks very similar to the CAD viewer from CadQuery, only there is no Python code, and it can be shared with a link now!
For your convenience, find the whole code here:
1from viktor import ViktorController
2from viktor.core import File
3from viktor.parametrization import NumberField, ViktorParametrization
4from viktor.views import GeometryResult, GeometryView
5
6# OpenCascade library
7import cadquery as cq
8
9class Parametrization(ViktorParametrization):
10    length = NumberField("Length", default=30, suffix="mm")
11    height = NumberField("Height", default=40, suffix="mm")
12    bearing_diam = NumberField("Bearing diameter", default=22, suffix="mm")
13    thickness = NumberField("Thickness", default=10, suffix="mm")
14    padding = NumberField("Padding", default=8, suffix="mm")
15    fillet = NumberField("Fillet", default=2, num_decimals=1, step=0.5, suffix="mm")
16
17class Controller(ViktorController):
18    label = "pillow block"
19    parametrization = Parametrization
20
21    @GeometryView("Geometry", duration_guess=1, x_axis_to_right=True)
22    def get_geometry_view(self, params, **kwargs):
23        """
24        Renders the 3D model. First it (re-)generates the assembly. Then,
25        exports the gltf data to a temporary file, which is passed to
26        GeometryResult and displayed as a GeometryView.
27        """
28        # obtain parametrization fields
29        (length, height, bearing_diam, thickness, padding) = (
30            params.length,
31            params.height,
32            params.bearing_diam,
33            params.thickness,
34            params.padding,
35        )
36
37        assy = cq.Assembly()
38
39        body = (
40            cq.Workplane("XY")
41            .box(length, height, thickness)
42            .faces(">Z")
43            .workplane()
44            .hole(bearing_diam)
45            .faces(">Z")
46            .workplane()
47            .rect(length - padding, height - padding, forConstruction=True)
48            .vertices()
49            .cboreHole(2.4, 4.4, 2.1)
50            .edges("|Z")
51            .fillet(params.fillet)
52        )
53
54        assy.add(body, color=cq.Color(1, 0.27, 0.0), name="body")
55        glb = File()  # temporary file to store 3D model as gltf data
56        cq.occ_impl.exporters.assembly.exportGLTF(assy, glb.source, True)
57        return GeometryResult(geometry=glb)
Conclusion
Embracing Python, CadQuery and AI can significantly enhance your efficiency as a CAD engineer. AI can help you move from an idea to a first working app faster, while a programmatic approach allows you to create robust, parametric models driven by engineering logic and the power of Python with CadQuery. That said, keep in mind that with CadQuery, you still have to define every part of your model from the start, which can be tricky and time-consuming, especially for more complex designs. It might feel like a lot of work at first, but once you've got the basics down, the payoff is well worth it.
Exporting models into various formats and integrating them with other engineering software improves workflows from FEM and CFD to CNC manufacturing. This approach can help you overcome the limitations of traditional CAD systems, making your designs more reliable and adaptable. Combined with AI and VIKTOR, it also opens the door to creating custom CAD applications faster, meaning the possibilities with CAD have become endless!
Start automating your workflows
Related Blog Posts

Get our best content in your inbox
Subscribe to our newsletter and get the latest industry insights