Download the white paper and get INSPIRED
Learn how collaborative parametric design models allow you to work together for better solutions.
What is SkyCiv?
If you are a structural or civil engineer, you might know SkyCiv. SkyCiv is a powerful cloud-based structural design software focusing on efficiency and innovation for the modern engineer. On top of that, it also has a fantastic API, supporting many modern programming languages, including python. Today, professionals in more than 160 countries use SkyCiv structural analysis and design software, and API technology to solve their projects.
Visit the SkyCiv website for more information.
What we like most about SkyCiv
With the same level of functionality as traditional structural analysis software, or maybe more, SkyCiv has many things we are enthusiastic about. However, we want to highlight these functionalities in particular:
- All calculations are done in the cloud, making it super easy to integrate SkyCiv into your web application. You don't need software running on your computer or company's servers, making company-wide licensing and distribution issues a thing of the past. We really liked that!
- Having a Python-enabled API is great! It enables you to use the complete Python ecosystem and powerful libraries such as NumPy, Plotly, and Pandas for your calculations.
- The model you make using the SkyCiv API is also a Python object and not just a text input file, meaning you can interact directly with it, read, and change its properties, and more!
- You can ask SkyCiv to render your model and results in HTML, making it possible to embed the completely interactive 3D model in your website or VIKTOR app. Enabling you, for example, to adjust the view, get information about the materials or sections, and calculate the distance between nodes inside your app.
- SkyCiv has a database with all kinds of section and material properties, and much cooler; you can also get the wind and snow load based on a GPS location.
SkyCiv and VIKTOR: A powerful combination
You hear us being quite positive about SkyCiv. So, why should you want to use it in combination with VIKTOR?
Like any FEM software, SkyCiv is powerful but requires specialist knowledge to make the most of it. Many processes can be automated, but that means working with an elaborate Python script using the SkyCiv API. Will all your colleagues be able to? Maybe, but probably not.
If you are looking for a way to make custom tools people can pick up and use quickly, you need a user-friendly interface on top of SkyCiv. Yes, we know you can make a product configurator directly with SkyCiv, but for this, you need to be quite handy with HTML and JavaScript. Here is where VIKTOR comes in handy.
With VIKTOR, you can quickly create a complete web-based user interface using nothing but Python, and it is easy too! On top of that, VIKTOR allows you to automate a larger part of your workflow by integrating your SkyCiv model with all kinds of other software packages. And what about the hosting? VIKTOR takes care of that too.
Select fullscreen for a better view of the application
The benefits of SkyCiv and VIKTOR
Integrating SkyCiv with VIKTOR brings out the best features of both software. Below, we have listed why we think SkyCiv and VIKTOR complement each other perfectly:
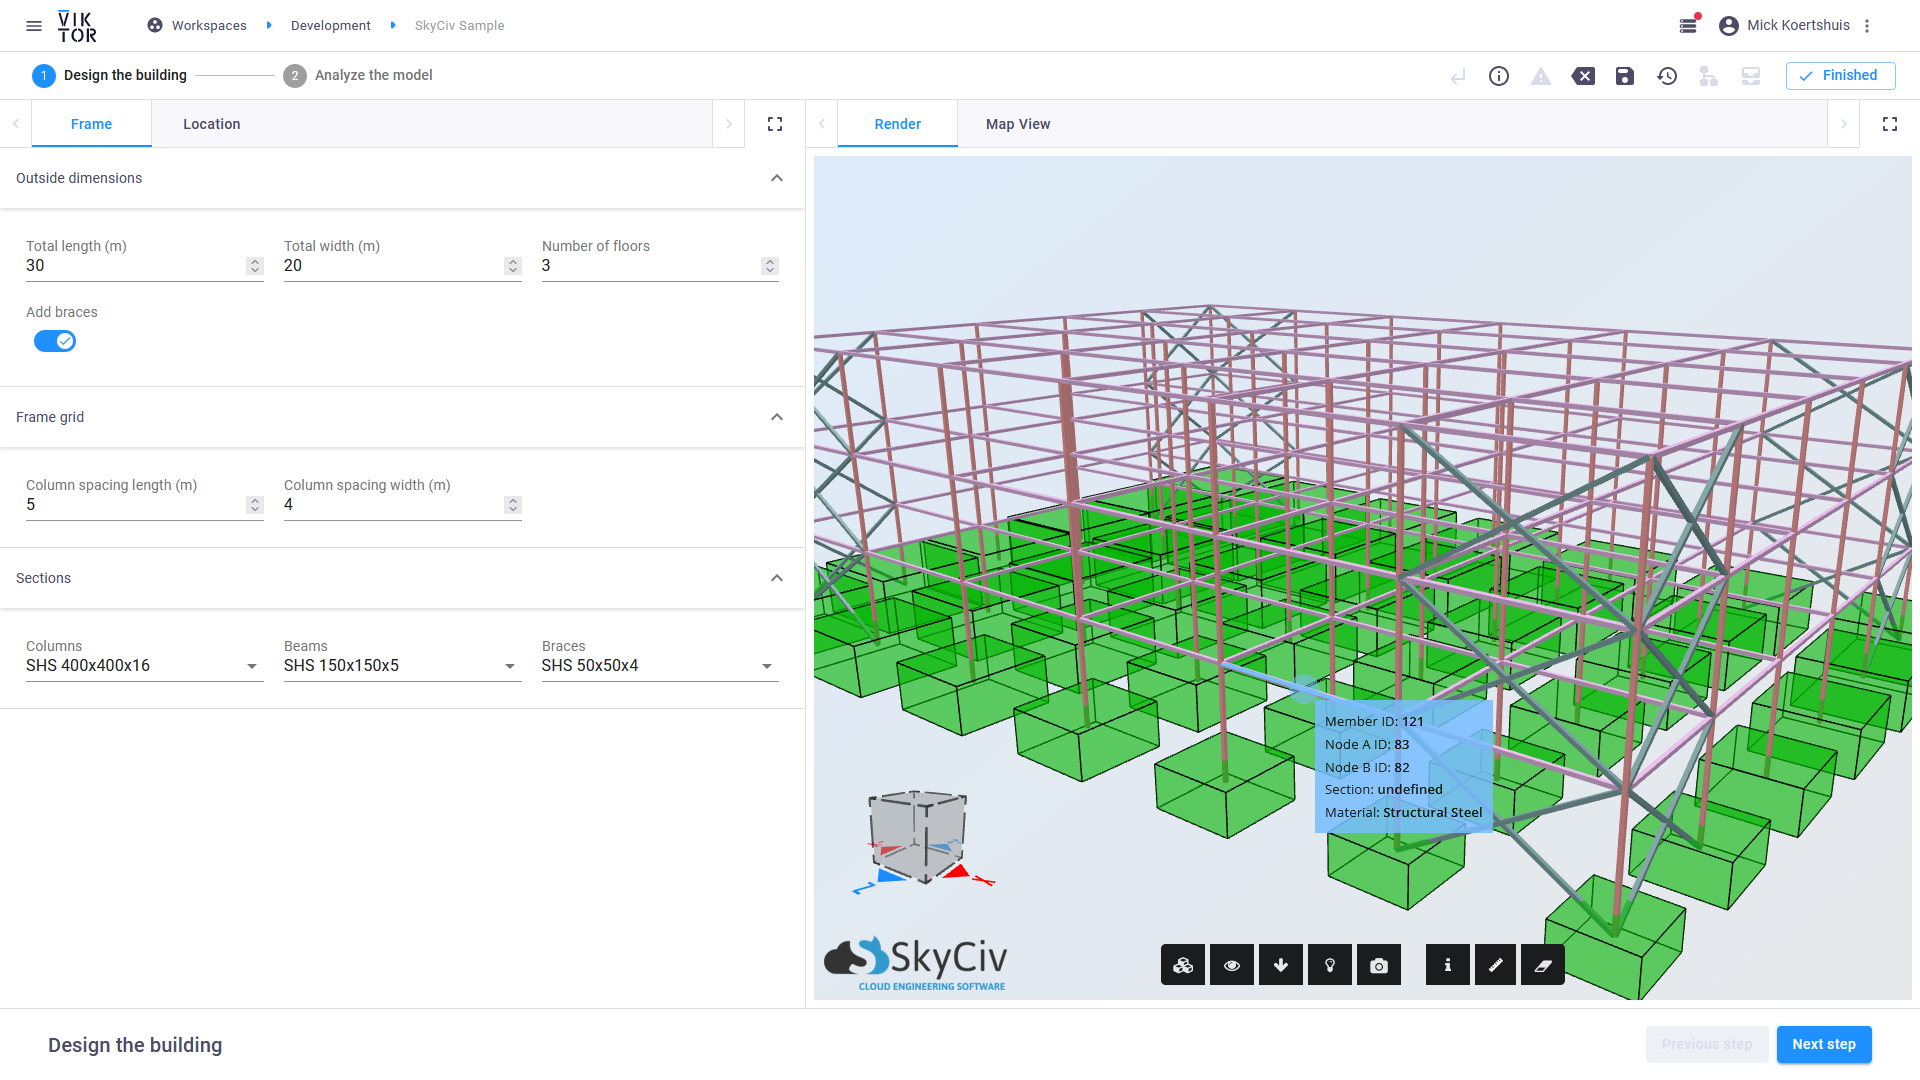
Accessibility: VIKTOR has an intuitive user interface, which makes it easy for other people to interact with your app. This makes building your SkyCiv model in an automated way much more accessible for people without (lots of) coding experience.
For example, this is a VIKTOR interface:
And this is the code you need to build a SkyCiv model:
1def _build_model_from_parameters(num_floors,
2            grid_num_width, grid_num_length,
3            nodes_per_plain, corner_positions,
4            neighbours, grid_size_length,
5            grid_size_width, add_braces
6        ) -> skyciv.Model:
7    """Builds a SkyCiv model with the chosen parameters"""
8    model = skyciv.Model("metric")  # Initialise an empty model
9
10    # Member ids:
11    # 1: Column
12    # 2: Beams
13    # 3: Braces
14
15    current_y = 0  # Would be the current height
16    for current_floor in range(num_floors + 1):
17        current_z = 0  # Would be the current "width"
18        for _ in range(grid_num_width):
19            current_x = 0  # Would be the current "length"
20            for _ in range(grid_num_length):
21                uid = int(
22                    model.nodes.add(current_x, current_y, current_z)
23                )  # Add the node to the model and record the id tag
24                # If the node ID is bigger then the nodes per plain
25                #   then there is a node below it
26                if uid > nodes_per_plain:
27                    # Connect the node to the node below
28                    model.members.add(uid - nodes_per_plain, uid, 1)
29                    # If the column is not the first in its row
30                    if (uid - 1) % grid_num_length > 0:
31                        # Connect beam in x direction
32                        model.members.add(uid, uid - 1, 2)
33                    # The id on its own floor
34                    floor_position = (uid - 1) % nodes_per_plain
35                    # If the column is not in the in the first row
36                    if floor_position >= grid_num_length:
37                        # Connect beam in z direction
38                        model.members.add(uid, uid - grid_num_length, 2)
39                    if add_braces:  # Enable braces on the model
40                        # Check for corners
41                        for c, n in zip(corner_positions, neighbours):
42                            if floor_position == c:  # This is a corner
43                                for sn in n: # Check every neighbour of corner
44                                    # Get the id of the neighbour
45                                    nid = sn+current_floor*nodes_per_plain+1
46                                    model.members.add(
47                                        nid, uid - nodes_per_plain, 3
48                                    )# Brace from neighbour to column of corner
49                                    model.members.add(
50                                        nid - nodes_per_plain, uid, 3
51                                    )# Brace from column of neighbour to corner
52                else:  # These nodes are on the floor
53                    # Add support to the floor node
54                    model.supports.add(uid, "FFFFFF")
55                current_x += grid_size_length  # Increment on the x-axis
56            current_z += grid_size_width  # Increment on the z-axis
57        current_y += FLOOR_HEIGHT  # Increment on the y-axis
58    return model
Speed: VIKTOR is like a box of digital building blocks you can assemble to create your own apps. With Python, you can use the full functionality of SkyCiv and VIKTOR, making it easy to build powerful and user-friendly applications quickly.
Adding a parameter
Adding a control
Integrate with other software: VIKTOR makes it easy to use SkyCiv in combination with (multiple) different ready-to-use integrations with industry-leading software, Like Excel sheets, Geotechnical Software, 3D modeling software, and much more. You can also generate custom reports based on your own templates.
Interactive visualizations: You can embed a completely interactive SkyCiv model into your VIKTOR app. Select, for example, which parts of the design you would like to show and which parts you would like to hide. You can also see information about the materials used for each member, forces, and calculate the distance between nodes. On top of that, you can use VIKTOR Views to enrich your app with maps, interactive graphs, other 3D models, and more.
For example, this is the web view in your VIKTOR app:
And this is the code used to create an HTML page for your VIKTOR web view:
1def get_html_render(model, mode: str = "model", results: str = None):
2        """The SkyCiv render is written in javascript. We can use the
3        webview to use it. However the webview only uses a single
4        html file. We therefor use the jinja utility to build the html
5        file.
6        """
7
8        # Build the html file
9        url = (
10            "https://api.skyciv.com/dist/v3/javascript/skyciv-renderer-dist-2.0.0.js"
11        ) # The url to the skyciv renderer
12        renderer = get_renderer(url)  # Request the renderer
13        context = {
14            "renderer": renderer,
15            "model": model.get(),
16            "mode": mode,
17            "results": results,
18        }  # Create the context to use with jinja
19        path = Path(__file__).parent.parent / "lib" # Template location
20        # Open the html file to be used as jinja template
21        with open(path / "renderer.html.jinja", "rb") as template:
22            # Build the html file using the template and context
23            filedata = render_jinja_template(template, context)
24
25        # The return type of the jinja utility is already an
26        # viktor.core.File so it can be directly used in WebResult
27        return filedata
Easy parametrization: It is super easy to create parametric structures with SkyCiv in VIKTOR. Simply connect the InputField, Sliders, and other features to your SkyCiv model, and see it change at the click of a button.
Total flexibility: You can create a parametric model in VIKTOR, but what happens if you want to add some specific details for a project? No worries, The SkyCiv API lets you save the models you send in their own cloud environment. So, if you want to edit details after designing your model, you can continue inside the SkyCiv editor.
The dashboard
Try SkyCiv in VIKTOR
In this video, you can see the SkyCiv API integrated with a VIKTOR web application. With only a handful of input parameters, a structural model is created and analyzed in no time.
There are three steps to using the application:
-
Design the building: First, insert the input parameters. The input parameters for materials are aligned with the materials in the SkyCiv database.
-
Map view: Second, go to the map view to select a point on the map that you can later use to calculate the snow load through the SkyCiv API.
-
Analyze: For this third step, you can choose for yourself which loads you use. There are two things you can do with the API request here: 1) Generate an analysis report from the model that you created that shows typical FEA results like nodal displacements, support reactions, and member forces. 2) View the deformations on the model inside the SkyCiv renderer. These deformations are based on the parameters you have set. This model is then also saved to your SkyCiv dashboard (see: 'Recent files').
What we can conclude
So, what we can conclude is that SkyCiv and VIKTOR together is a powerful combination. Linking SkyCiv's advanced FEM software - which often requires specialist knowledge to use to its full potential - to the user-friendly and intuitive interface of VIKTOR, enables not only specialists but also other (structural) engineers to automate and optimize their workflows!
With easy accessibility, design and calculation speed, the ability to integrate with other software, interactive visualizations, easy parametrization, and total design flexibility, we invite you to build your own SkyCiV - VIKTOR apps. Download the full code from our GitHub repository and sign up for a free VIKTOR account to start building awesome apps!


